
How to Make Eco-Friendly Gift Packaging for Your Sourdough Starter
* Disclosure: Some of the links on this website are “affiliate links,” which means receive a small commission at no additional cost to you if you purchase something through them. As an Amazon Associate, I earn from qualifying purchases. However, I only recommend products or services I believe will provide value to my readers.
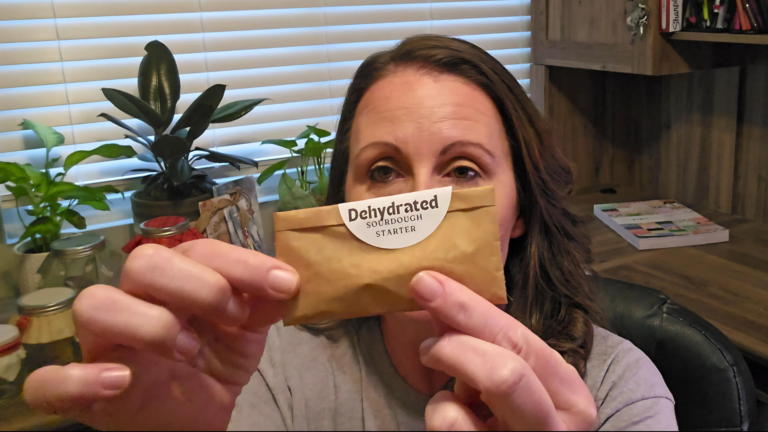
Welcome to Part 3 of our series on gifting dehydrated sourdough starter! We’ve covered quite a journey together. In Part 1, we explored creative gift-wrapping ideas. Part 2 showed you how to create a different simple parchment pouch. Today, I’m thrilled to share another eco-friendly packaging option: an envelope-style pouch for dehydrated sourdough starter. It’s a charming way to present your starter without relying on store-bought materials.
For those who prefer video learning, I’ve created a step-by-step YouTube video tutorial. Check it out below:
Here for the downloads?
Looking for the free Rehydration guide and Labels? Just click the link below to access those goodies. And don’t worry – they’re completely free, no email required!
If you’re curious about other folding techniques, be sure to check out Part 2 of this series. It offers a different method for creating a parchment pouch, giving you even more gifting options.

Materials Needed:
- Parchment paper (8×8 inch square) – What I use from Amazon Unbleached Parchment Paper *
- Ruler
- Pen (optional)
- Scissors
- Dehydrated sourdough starter
- Labels or stickers (optional) The labels I use in this in this tutorial from Amazon – Labels *
Step-By-Step Instructions – an envelope-style pouch for dehydrated sourdough starter:
Step 1: Prepare Your Parchment Paper
Cut a square piece of parchment paper measuring 8 inches by 8 inches.


Step 2: Make your first Fold
Position your square like a diamond in front of you. Fold it in half diagonally to form a triangle.
Step 3: Mark Your Folding Points
Measure about 3.5 inches from each corner along the folded edge. Make a small mark or crease at these points.

Step 4: Create the Side Flaps
Fold the corners up to meet the marks you made in Step 3. This creates flaps on both sides of your diamond shape. Press the folds firmly to create crisp edges.


Step 5: From the Bottom of the Envelope
Measure 2 inches up from the bottom point of your parchment paper. Make a small mark on both sides at this point. Fold the bottom point up to meet these marks.
Step 6: Fold
Fold over and either tuck it into the pocket created by the other flap or fold it and apply a label. This forms your envelope shape.


Finishing Touches
- Add a personal touch with a handwritten note or card.
- Include the rehydration instructions (remember, you can download these for free from the link at the bottom of this post).
- Consider bundling your starter with other baking essentials for a complete gift set.
Rehydrating Sourdough Starter Guide
Master the art of bringing dehydrated starter back to life with our comprehensive 2-page guide. Perfect for beginners and experienced bakers alike.
A Note About Our Downloads:
I believe in sharing knowledge freely, without hoops to jump through. That’s why these downloads are completely free and won’t ask for your email address. No strings attached – just click, download, and enjoy!
Your sourdough journey shouldn’t be gated by sign-ups or subscriptions. So go ahead, grab your free guides, and let’s get baking!

This download is 2 pages. I prefer to set my printer to print on both sides.
Labels For Your Dehydrated Sourdough Starter
Elevate your sourdough gifting game with these charming, professionally designed labels. Perfect for adding a personal touch to your dehydrated starter packages, these versatile designs work beautifully on various label sizes and types.
While I used these on 2-inch circle labels (available here on Amazon *), feel free to adapt them to whatever works best for you. The beauty of these designs is their flexibility – they’ll look great on many label types.
The fold-over labels are especially handy if you’re using our DIY paper envelope method (tutorial coming soon!). They create a seamless, professional look by displaying the correct image on both sides of your package.
Whether you’re gifting starter to friends, selling at markets, or just want to keep your own starters organized, these labels add that extra special touch. They’re easy to print at home or through a local print shop, giving you full control over your packaging.
Remember, while I found the 2-inch circles ideal for my needs, the beauty of these digital designs is that you can resize them to fit whatever label size works best for your specific packaging. Get creative and make your sourdough gifts truly stand out!


There you have it – a simple, charming way to package your dehydrated sourdough starter for gifting. This envelope-style pouch is not just eco-friendly, it’s also a testament to the care and thought you’ve put into your gift. Every fold represents a bit of your time and love, making the gift of sourdough starter even more meaningful.
Remember, sharing sourdough starter is more than just passing on some flour and wild yeast. It’s an invitation to join a centuries-old tradition of bread-making, a nudge towards self-sufficiency, and a connection to a slower, more mindful way of living. In our fast-paced world, that’s a pretty special gift indeed.
Have you tried this method? Or do you have your own creative ways of packaging sourdough starter? I’d love to hear about them! Drop a comment below and share your experiences. And don’t forget to check out Parts 1 and Part 2 of this series for even more gifting ideas


Leave a Reply